Stick welding is one of the oldest types of welding and is still widely used today on various applications, such as construction and earth-moving equipment, thanks to its simple technique. While it may not be as easy as MIG welding for a beginner, it’s definitely not as hard as TIG welding.
Stick welding is a good middle ground and is perfect for those who don’t want the hassle of a gas tank or want to weld thicker pieces of metal.
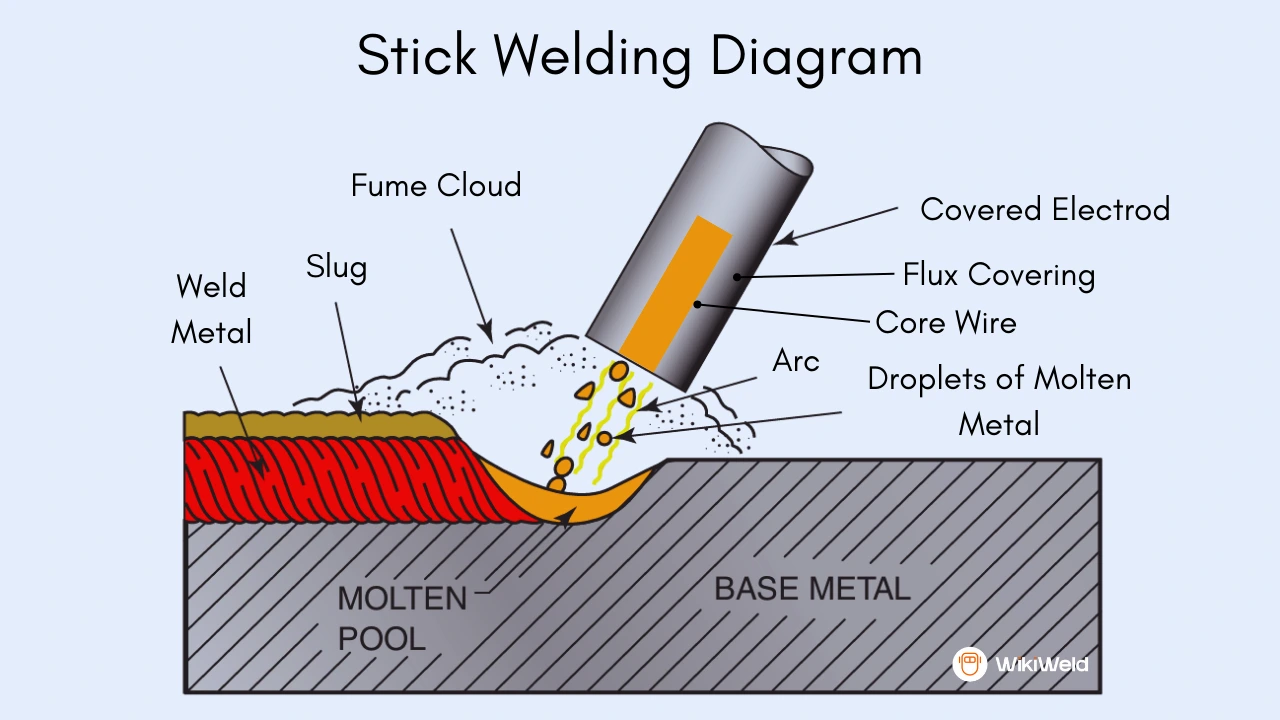
What is Stick Welding (SMAW)?
Stick welding also known as manual arc welding, manual electrode welding, manual metal arc welding, or shielded metal arc welding (SMAW) is usually the first welding process that welders are taught during training. It is easy to learn, but already offers insights into the way that welding systems work and into the ratio of metals to electrical voltage.
Stick welding is performed by striking an electric arc between a metal electrode and the workpiece. An electric current passes through the electrode and melts it into the workpiece and forms a weld pool. The electrode is covered in a layer of flux which melts and protects the weld pool from being contaminated by the atmosphere.
The flux forms a layer of slag to be formed on top of the weld bead which will need to be chipped off and brushed down once the weld is complete.
An electric current, in the form of either alternating current or direct current from a welding power supply, is used to form an electric arc between the electrode and the metals to be joined. The workpiece and the electrode melts forming a pool of molten metal (the weld pool) that cools to form a joint.
As the weld is laid, the flux coating of the electrode disintegrates, giving off vapors that serve as a shielding gas and providing a layer of slag, both of which protect the weld area from atmospheric contamination.
Because of the versatility of the process and the simplicity of its equipment and operation, shielded metal arc welding is one of the world’s first and most popular welding processes. It’s a simple procedure that is popular with outdoor welders due to it not being affected by wind – unlike MIG and TIG welding which uses gas cylinders.
It dominates other welding processes in the maintenance and repair industry, and though flux-cored arc welding is growing in popularity, SMAW continues to be used extensively in the construction of heavy steel structures and in industrial fabrication. The process is used primarily to weld iron and steel (including stainless steel) but aluminum, nickel, and copper alloys can also be welded with this method.
Stick Welding Diagram
What do You need to Start Welding?
1. Safety Equipment
When welding the most important consideration is always your safety. You must read and follow all the safety information and instructions provided in the manual for any equipment you use when stick welding.
When welding you will need body protection to protect from the heat and ultraviolet rays and sparks produced by the arc. Fire-retardant long-sleeved clothing will protect your body, and safety glasses and a welding helmet will protect your head and eyes.
Welding should only be performed when there is adequate ventilation due to the fumes emitted. If you’re outside in a breeze you’ll be fine, but if you’re indoors you need ventilation. Exhaust is the best way to remove fumes from the area.

2. Stick Welder
You won’t be able to do any stick welding without a stick welder. You can either use a multipurpose welder that will let you perform more than one type of welding, for example, MIG, TIG & Stick. Or you can use a stick-only welder, which is a lot cheaper.
There are a lot of welders on the market. You can see our full guide on choosing a stick welder for more help on this.
3. Ground Clamp
Your ground clamp will usually come with the welder. if should be plugged into the stick welder and clamped to the workpiece.
4. Slag Removing Tools
Stick welding produces slag over your weld. For this reason, you’ll need to clean up the weld after you’ve done it. You’re best using a slag chip and hammer to chip the slag away, and following this up by scrubbing with a wire brush.
5. Choosing your Electrode
There are hundreds of different types of stick electrodes out there, and you’ll need to choose the right one that matches your welding project. The most popular are 6010, 6011, 6012, 6013, 7014, 7024, and 7018.
When you’re working on mild steel, any E60 or E70 electrode will do the job. 7018 is probably the most popular electrode of all these and produces really strong welds but 6013 is a good choice for beginners.
To understand which electrode to choose you to need to understand what each of the 4 numbers means.
- The first two digits show the minimum tensile strength. For example, a 60,000-psi tensile strength electrode will start with 60. This will need to match the base metal strength properties.
- The third digit indicates which positions the electrode can be used when welding. The number one represents the ability to be used in any position, whilst number 2 can only be used in flat position.
- The fourth digit tells you the current that you can use for the electrode and the coating on the electrode. We have a reference chart for that below.
6. Stick Welding Setup
Stick welding is a fairly straightforward setup. Remember that your polarity settings will depend on the electrode you’re using so be sure to double-check whether it’s AC/DC-/DC+. To get started try some 6013 electrodes on DCEN on some 3/16-inch steel plate.
How to Lay Your First Stick Weld
So, you’ve set everything up, now you’re ready to lay a weld. Make sure your settings are all correct and get a couple of pieces of scrap metal and place them down as a butt joint. Stick welding requires a bit of skill, so it’s always best to practice on some scrap metal first before you jump in there and start trying to weld on an actual project.
Striking the Arc
Once the full electrode is in the electrode holder, turn on the welder. To strike the arc, place the tip of the electrode onto the metal, and quickly drag it across as if you’re striking a match. It the arc is formed, lift up the electrode very slightly and then you can pull it also the metal.
The electrode sticks to the metal and breaks it off by giving it a slight twist. If the arc cuts out, then you have lifted up the electrode too high from the surface and should have it lower. Once the arc is lit it should make a sound like frying bacon, it sounds loud and aggressive then you need to turn the amperage down.
Moving the Electrode
Once you’ve lit the arc you should move the electrode across the joint to perform the weld. Before you move the electrode, you need to have it at the correct angle which is between 15 and 30% to the vertical.
Stick Welding Angle
Once you have it at the correct angle you need to slowly pull the electrode back towards you. You can’t push the electrode because the slag will get trapped in the weld pool and cause porosity.
You’ll need to keep a steady hand so try resting your other elbow on the table and holding your hand that’s holding the electrode to steady it. Test it out a few times and troubleshoot by using the troubleshooting section at the end of this post.
Other Welding Positions
If you fillet weld an upside-down T weld, you should adjust the angle to about 35% up from the horizon tonal. This is because the weld will start to fall slightly due to the force of gravity if the angle is not adjusted to help push the bead back up against the force of gravity.
The more slag that is created the larger angle you’ll need. If your angle is too small, the slag will fall into your weld pool and cause weld defects.
Common Mistakes and How to Reduce Them
When you start out stick welding it’s likely you’ll make some mistakes, even if you’re experienced in MIG or TIG. The most common mistakes I see are having too long an arc, having the wrong drag angle, welding at the wrong speed, and the wrong temperature.
- Lots of Spatter: There are lots of causes for getting too much spatter when you’re welding, one of the most common is having the arc too long. You should hold the electrode only very slightly above the workpiece, or else the arc won’t be able to focus and will jump around erratically instead of being smooth. If there’s spatter and the arc lets out a loud screeching sound then you’ve probably got the amperage on too high and should turn it down.
- Porosity: One of the main causes of porosity in a stick weld is having the electrode at too steep an angle. If you don’t keep the slag at the back of the weld pool by pulling the electrode back at an angle then the slag will mix into the puddle and cause porosity.
- Undercut: Undercut is having a little crater at the toe of the weld between the weld and the metal plate, which makes the weld weaker. If you have an undercut and the weld looks burnt out, try turning the amperage down because it’s too hot.
- Thin Weld Bead: The ideal stick weld bead will be roughly 2.5 times the diameter of the electrode. If the weld is really narrow then it won’t have sufficient penetration. Try slowing down by about half the speed that you were initially pulling the electrode and you should see better results.
- Lumpy Weld Bead: If you’re pulling the electrode too slowly, the filler metal will pile up will and be lumpy. Another cause is having the amperage too low which will limit penetration and cause the filler metal to just sit on top of the joint.
- Trouble Starting Arc: If you have trouble starting the arc then it will be because it’s too cold which is causing a weak arc. Try turning it up by 15 amps or so and see if it’s any easier.
Five Steps to Improving Your Stick Welding Technique
For many people, especially those who are new to it or perhaps don’t weld every day, stick welding, otherwise known as shielded metal arc welding (SMAW), is one of the more difficult processes to learn. Experienced welders who can pick up a stinger, pop an electrode in, and lay down great welds time after time can inspire great awe in the rest of us. They make it look easy.
The rest of us may struggle with it, though. And we don’t have to, not if we pay attention to five basic elements of our technique: current setting, length of the arc, angle of the electrode, manipulation of the electrode, and speed of travel or CLAMS, for short. Properly addressing these five basic areas can improve your results.
1. Pre-Preparation
While stick welding may be the most forgiving process on dirty or rusty metal, don’t use that as an excuse for not properly cleaning the material. Use a wire brush or grinder to remove dirt, grime, or rust from the area to be welded.
Ignoring these steps hurt your chances to make a good weld the first time. Unclean conditions can lead to cracking, porosity, lack of fusion, or inclusions. While you’re at it, make sure you have a clear spot for the work clamp. A good, solid electrical connection is important to maintain arc quality.
Position yourself so you have a good view of the weld puddle. For the best view, keep your head off to the side and out of the weld fumes to ensure you’re welding in the joint and keeping the arc on the leading edge of the puddle. Make sure your stance allows you to comfortably support and manipulate the electrode.
Don’t get discouraged! There is a learning curve with stick welding, which many believe got its name because when learning how to weld, everyone sticks the electrode to the workpiece.
2. Current setting
The electrode you select will determine whether your machine should be set up in DC positive, DC negative, or AC. Make sure you have it set correctly for your application. (Electrode positive provides about 10 percent more penetration at a given amperage than AC, while DC straight polarity, electrode negative, welds thinner metals better.)
The correct amperage setting primarily depends on the diameter and type of electrode you select. The electrode manufacturer usually indicates the electrode’s operating ranges on the box or enclosed materials.
Select your amperage based on the electrode (a general rule of thumb is 1 amp for each .001-inch of electrode diameter), welding position (about 15 percent less heat for overhead work compared to a flat weld), and visual inspection of the finished weld. Adjust your welder by 5 to 10 amps at a time, until the ideal setting is reached.
3. Length of arc
The correct arc length varies with each electrode and application. As a good starting point, arc length should not exceed the diameter of the metal portion (core) of the electrode. For example, a 1/8-inch 6010 electrode is held about 1/8 inch off the base material.
4. Manipulation of electrode
Each welder manipulates the electrode a little differently. Develop your own style by observing others, practicing, and noting which techniques produce the best results. Note that on material 1/4 inch and thinner, weaving the electrode is typically not needed because the bead will be wider than necessary. In many instances, a straight bead is all that’s needed.
To create a wider bead on thicker material, manipulate the electrode from side to side, creating a continuous series of partially overlapping circles in a ‘Z,’ semi-circle or stutter-step pattern. Limit side-to-side motion to two times the diameter of the electrode core. To cover a wider area, make multiple passes or use stringer beads.
When welding vertically up, if you focus on welding the sides of the joint, the middle will take care of itself. Move across the middle of the joint slowly enough so that the weld puddle can catch up, and pause slightly at the sides to ensure a solid tie-in to the sidewall. If your weld looks like fish scales, you moved forward too quickly and didn’t hold long enough on the sides.
5. Speed of travel
Your travel speed should allow you to keep the arc in the leading one-third of the weld pool. Traveling too slowly produces a wide, convex bead with shallow penetration and the possibility of cold-lapping, where the weld appears to be simply sitting on the surface of the material.
Excessively fast travel speeds also decrease penetration, create a narrower and/or highly crowned bead, and possibly underfill or undercut, which is when the area outside of the weld is concave or recessed. Note toward the end of the bead in the image below how the bead appears inconsistent as if the puddle were trying to keep up.
Advantages of Stick Welding
- No separate shielding gas are required.
- Basic equipment is used.
- A wide range of types and sizes of electrodes are available.
- It can be used with a variety of metals. …
- It works well outdoors and indoors.
- It can be learned fairly easily.
- It’s good for a range of projects.
Disadvantages of Stick Welding
- Compared to other methods of welding, stick welding is slow.
- It is a more complicated process, which requires a welder with skill and experience in stick welding
- It is time-consuming to chip away the slag that formed during the weld
- It can be difficult to weld thinner metals
- The welding rods must be replaced more frequently than in other types of welding
- There can be excessive spatter, rough surfaces, and porosity with stick welding